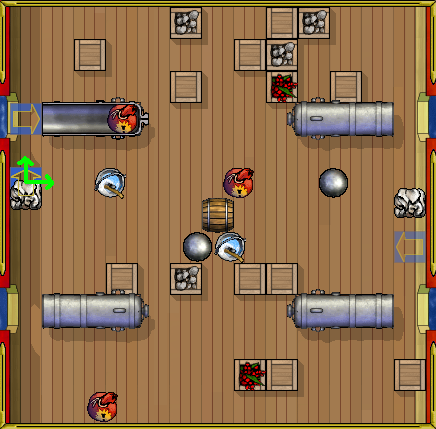
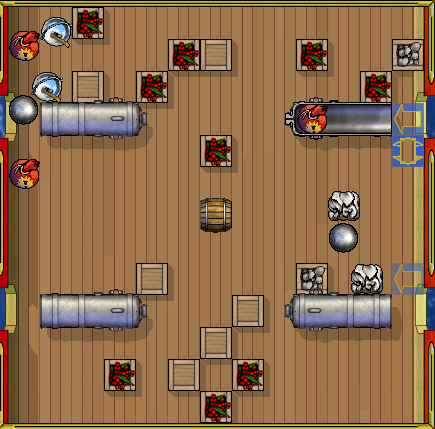
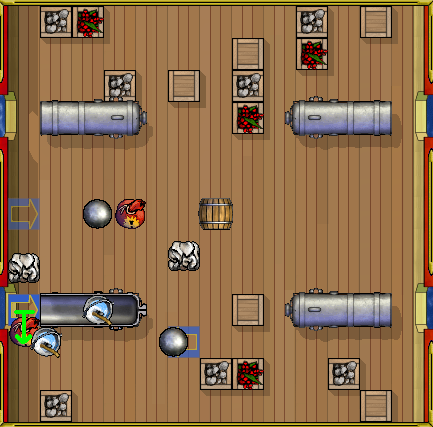
Top gunner
| The topic of this article is subject to personal opinion, and does not represent any one absolute truth. | |
| If you disagree, discuss your concerns on the the talk page before editing. |
Contents
- 1 Top Gunner
- 1.1 What is this?
- 1.2 Introduction
- 1.3 General Gunning Tips
- 1.3.1 Control Style
- 1.3.2 Practice!
- 1.3.3 Find a good starting pattern
- 1.3.4 Make small loops
- 1.3.5 Refresh important arrows
- 1.3.6 Fill one cannon at a time
- 1.3.7 Reset the loading arrow
- 1.3.8 Scan upcoming pieces ahead of time
- 1.3.9 Every loop should have all the pieces needed in it
- 1.3.10 Open the door to the next cannon
- 1.3.11 Planning the next loop
- 1.3.12 Play it safe
- 1.3.13 How to get new pieces into the loop
- 1.3.14 Use guard arrows near the cannon
- 1.3.15 Cannons with no loop
- 1.4 Pillage Gunning Tips
- 1.5 Navy Gunning Tips
Top Gunner
(Going from Ultimate to #1)
What is this?
This guide teaches advanced Gunning tactics, to turn the above-average gunner into a Top Gunner. There is a significant amount of information here that applies to gunning with speeds above Grand Master and Legendary. Strategies for lower-standing gunning are much more solid and proven, and can be found off the main gunning page. This guide was created by Rapportus.
- See also Gunnery
Introduction
Gunning scoring is entirely based on the rolling average time it takes to load one gun, with few bonuses/deductions. This means loading 2 guns in 20 seconds is no better than loading 1 gun in 10 seconds. It is the gunner's goal, then, to maximize this average as best he can. There is also a slight bonus for cleaning a dirty gun. All things being equal, it is actually better to gun on a pillage than in the navy. Most gunners, however, just aren't efficient enough on a pillage for this to be effective. For more information, see Gunning scoring.
General Gunning Tips
Control Style
Rapportus, the creator of this guide uses a control style similar to FPS games, called WASD. The keys are used for changing arrow directions, while the mouse moves where the arrows will go and mouse clicks place the arrows. This is in contrast to click-dragging to change arrow directions, which is slightly slower, and has been more prone to errors for Rapportus.
Practice!
Practice makes perfect. If the current speed of pieces is too fast to practice on, use an alt with a very slow speed to help learn some of the techniques described in this guide. You can also dump pieces off the side of the board to slow your game down some, but the time penalty for slower pieces will hurt your score.
Find a good starting pattern
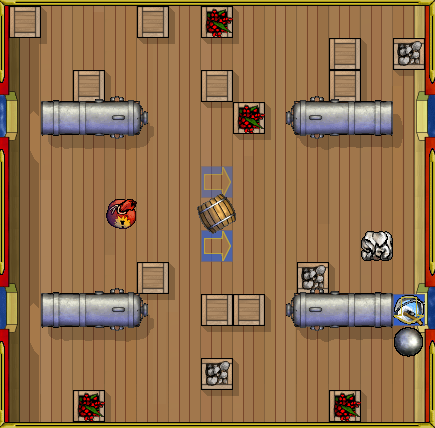
It is good to have a preset pattern of arrows to start off every board. Those arrows should simplify the set up for the first cannon loaded. In addition, this gives time to evaluate the rest of the board while loading the first cannon.
Above is a decent starting pattern. It quickly corrals most (all but the left of the barrel) of the pieces shot out from the barrel toward the bottom-right cannon, and still leaves one free arrow for loading the cannon. The herding arrows near the barrel can be replaced by loop arrows for the cannon once all pieces have been spit out from the barrel.
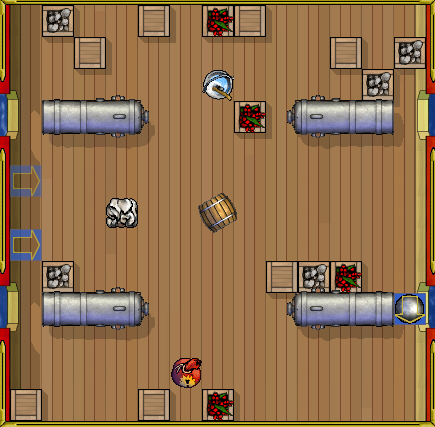
This is a variation from above. It corrals all but the top of the barrel's pieces. Note it is a bit slower, but the top pieces will eventually be corralled by the Left Arrows as well.
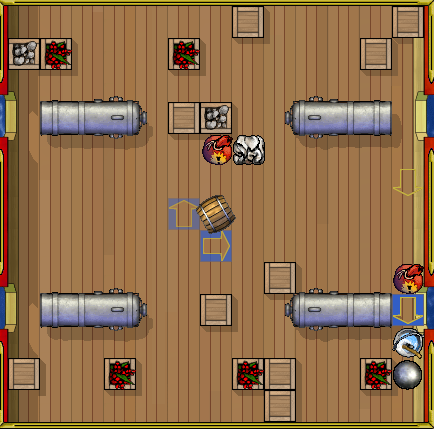
This pattern is not always possible, but is more effective. It quickly redirects every piece toward the bottom-right cannon, while still leaving one free arrow to load the cannon.
Of course there are many other variations, as these are just some examples. These patterns will work for the top-left cannon as well.
Make small loops
This may sound obvious but it is often overlooked. While having a nice 1-arrow board that loops around all four cannons is great, filling those cannons can be slow and inefficient. This is due to the waiting time for pieces looping around the board. In fact, the ideal board is one with a small 1- or 2-arrow loop around each cannon with easy transitions across the board. With every loop requiring at most 2-arrows, there will always be a free arrow to load the cannon.
While at first glance this looks like a poor board because of the clutter on the lower half, it is actually a very good board to load all 4 guns. The board has four single-cannon 2-arrow (or better) loops, with easy transitions across most of the board.
Refresh important arrows
While setting up a loop, make sure to refresh the important arrows of the loop so pieces can't escape prematurely. This loss of time is devastating while gunning for #1.
Fill one cannon at a time
Treat this as a rule of thumb. Because often 2 or all 3 arrows are devoted to maintaining one loop, it makes sense to finish the cannon that loop is for. Loading two cannons simultaneously requires 2 arrows (one per cannon). This leaves only 1 free arrow to create a loop around both cannons, which is rarely possible. Thus loading only one of the two cannons at a time frees up a second arrow for looping, which is much more manageable, and often will save time.
Reset the loading arrow
After every piece is loaded into a cannon, reset the arrow that loaded that cannon to a new direction so that an unwanted piece won't enter the cannon as well. This should always be done immediately after the cannon is loaded.
Scan upcoming pieces ahead of time
This should come naturally in order to be a solid gunner. In the board pictured above, the bottom-right cannon should only need 2 more cycles of the loop to be filled; Either of the powders can be used to start the fill, then picking up the wad and shot when they cycle around again, in order.
Every loop should have all the pieces needed in it
The largest factor in slowing a gunner down is not having the correct pieces in the right place at the right time. Using loops allows the gunner to corral all the pieces needed to load a cannon. However if the loop is missing a vital piece, the gunner must fish out that piece from somewhere else on the board, risking breaking the loop and losing other vital pieces. When a loop is created around a cannon, ensure it has all the necessary pieces in it to complete filling the cannon.
This may mean collecting some pieces into the loop, then fishing for others while maintaining the loop. This is why refreshing important arrows is vital. Notice with the above example that the loop doesn't have every piece on the board in it, but it at least has 1 each of the powder, wad, and shot. If one of these pieces were missing, the cannon would take much longer to fill.
Open the door to the next cannon
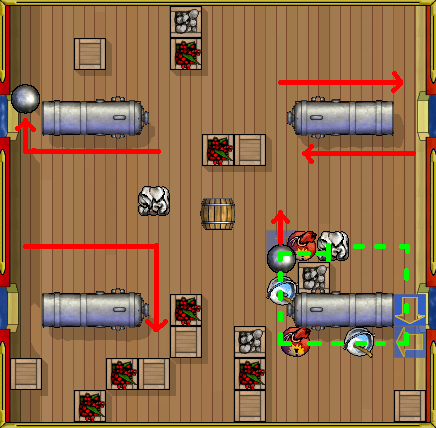
Continuing with the board pictured above, as soon as the shot that is to be loaded in the bottom-right cannon passes the Right Arrow for the final time, that arrow can be turned to an Up Arrow to transition the remaining pieces toward the top-right cannon for loading.
The green dashed-line is the path the shot will take just before being loaded into the cannon as the final piece. Just after it passes the Right Arrow, that arrow can be turned into an Up Arrow to provide easy transition to the next cannon, before the shot is even loaded. This will save time preparing to load the next cannon.
Planning the next loop
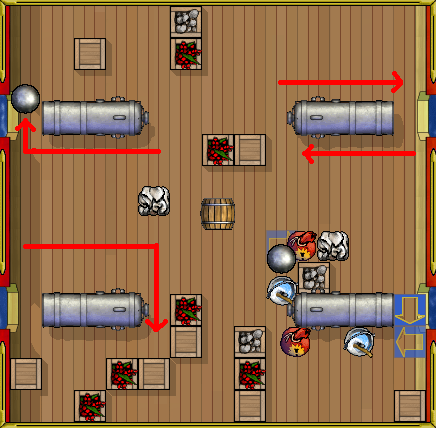
This is where the most time is gained or lost. Much like above's 'Opening the door' example, just before a cannon is loaded, the gunner should open up that cannon's loop to transition the remaining pieces to the next cannon to be filled. This may require several arrows to redirect the pieces, however ideally it should only require changing one of the previous loop arrows. The key is to keep them in a stream near eachother at all times. In the example, once the bottom-right cannon is filled, the Right Arrow will be turned into an Up Arrow, allowing all the pieces to flow into the next loop path. While the pieces are moving upward, set up the remainder of the new loop ahead of time by placing a Left Arrow just below the top-right cannon. It is also possible to shrink the loop down some by placing a Right Arrow along the vertical path (as the red path arrows show).
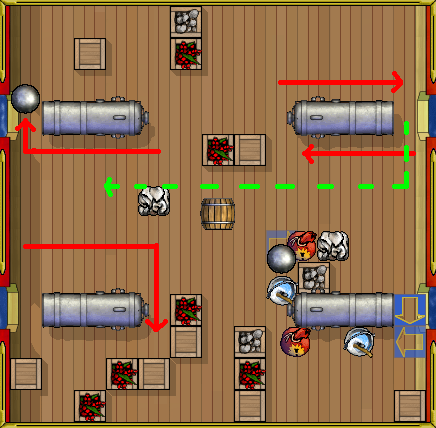
After the top-right cannon has been loaded, the pieces can transition across the board to the top-left cannon, as shown with the green dashed line. While the pieces are moving horizontally across, set up the loop for the top-left cannon, which is just one Left Arrow indicated by the red path arrow. From here, the final transition to the bottom-left cannon should be obvious.
Play it safe
Once a small loop is set up, it's important to understand there is less margin for error. Many pieces will likely be adjacent to each other, while moving at a high speed. However, the time penalty for missing loading a piece, and it having to loop all the way around the cannon again, is relatively small. This is the point of using small loops. With that in mind, don't risk a misload if waiting one cycle of the loop would yield a higher chance at loading correctly.
For example, if these pieces were traveling toward the right and then down in a loop, The powder and wad are in the correct order to load but have trash in between them. At very high speeds, it may not be worth the risk to attempt to load both the powder and the wad in the same loop cycle, and instead only load the powder, waiting for the wad to cycle around in a (small) loop. Only the best gunners can successfully pick out the correct pieces with high accuracy.
Another example of playing it safe would be with the board example from above. In loading the bottom-right cannon, it is safer to use the solo powder, not the powder trapped between the wad and shot. Take note, however, that this makes loading the wad and shot more difficult when those pieces cycle around.
How to get new pieces into the loop
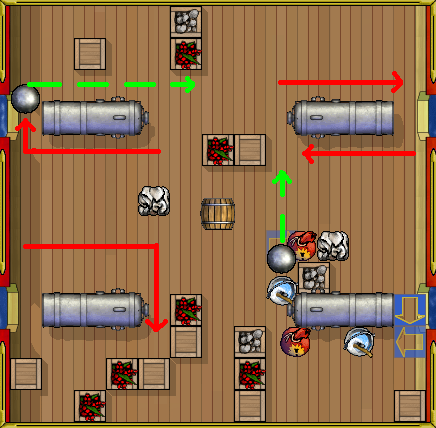
The best time to gather new pieces into a loop is during the transition time between cannons. Because there are still free arrows before loading the next cannon begins, it is safe to place down herding arrows to redirect new pieces toward the new loop. In the example, during the transition upward from the bottom-right to the top-right cannon, place a herding arrow just above the top-left cannon, as pictured by the green dashed line below. This will help corral any pieces that are on the left side of the board to the new loop.
This board has several natural loops that help send pieces toward the new loop for the top-right cannon. When a board doesn't help as much, it may be necessary to use several herding arrows at a time. The skill of a top gunner shines through by refreshing the arrows in the loop while herding in new pieces, since all of this often requires 4 or 5 arrows at one time. Once this hard work is done, loading the cannon should be simple.
Use guard arrows near the cannon
Guard arrows protect a loop from being interrupted by rogue pieces, which can cause bounce-back and risk losing a vital piece from the loop. Often, the loop arrows themselves are guard arrows.
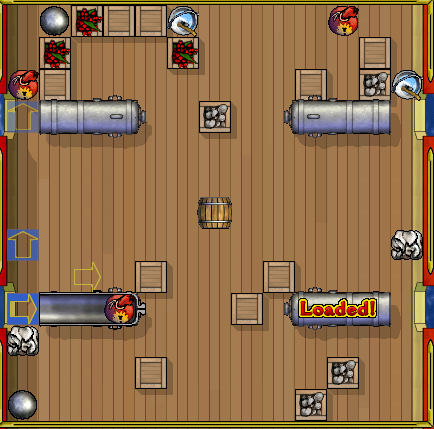
Here, the Up Arrows serve as guard arrows, blocking the rogue powder and shot pieces at the top from interrupting the wad and shot, which are about to fill the bottom-left gun.
Cannons with no loop
Some cannons cannot have a loop around them, such as a cannon with a dead end next to it. There are two cases for this: the 'easy cannons' (lop-left and bottom-right cannons), and the 'hard cannons' (bottom-left and top-right cannons). The latter two are significantly harder to load because of the way pieces turn at walls. However, any technique that works on one cannon will work on the other in its set.
Filling the easy cannons
This technique involves creating a loop around the middle of the board using two arrows, with the third left for filling the cannon. However, instead of resetting the loading arrow (which actually loads the cannon), reset the loop arrow near the cannon.
Here, the loop arrow just below the top-left cannon is the arrow that is used to maintain the loop around the middle of the board, or to load a vital piece. The loading arrow should not have to be changed. Note there is some risk in this technique because the loading arrow always points toward the cannon, which would allow an unwanted piece to fill should it come from the above the cannon.
Filling the hard cannons
This technique is not always possible, and can be risky much like filling the easy cannons above. If gunning in the Navy, it is probably best to avoid this technique and reset the board instead.
Here there is a loop set up just below the top-right cannon which is similar to loading the easy cannons. The Up/Down Arrow is the key arrow to change back and forth to complete the load.
Pillage Gunning Tips
Gunning during a pillage usually consists of finding a good board and camping it. Note that this usually is not the best strategy for scoring, but is often better for the good of the pillage. This is because camping a board will spend more time in the puzzle loading a cannon, resulting in a lower score, but the gunner will load more cannons per battle turn. Often the best gunners will load two or three cannons and reset, as if it were Navy Gunning. This reduces the number of overal cannons filled, but increases the gunner's score since he was efficient at those fills.
The pillaging tips below assume board camping rather than board hopping (Navy Gunning).
Predict which cannon needs to be loaded
This mainly applies to sloop pillaging, since it only has four shots (one board) to fill. Thus, all fired shots will come from the board being camped. On a war brig, this will likely not be the case.
After the first few shots are fired, a pattern should emerge as to the order the cannons on the board are used up (For example: Top Left, Bottom Left, Top Right, Bottom Right, repeat). Use this knowledge to predict the next cannon to be fired and prepare a loop ahead of time while waiting for new shots to be fired. This will save a significant amount of time and allow for 4-cannon fills in one battle turn (usually required for an Incredible).
Use the wash delay as a wall
It is possible to use the ~1 second delay washing out a cannon has as a way to save pieces. This is a bit risky but can save time waiting for pieces to cycle around again if there is a slow (or no) loop for that cannon.
Assume the bottom-left cannon needed washing. Leaving the loading arrow pointing toward the cannon will block pieces from going past the cannon. This would save the powder for filling as soon as the wash completes. Note that other pieces will also be trapped in, so it is is important to reset the loading arrow at the correct time, so as to not booch the fill. In this example doing this is not necessary since there is a simple loop around the cannon, but had there not been one this would save a good amount of time toward starting the fill on this cannon.
Use the barrel as a free arrow
The barrel is often a good place for starting a loop around a cannon, such as in the example above. Note that the barrel can move during a pillage when the ship turns, which can both help and hurt the board. Pausing the puzzle while the ship makes its turns will save the barrel from moving. Often using the barrel frees up an arrow for corralling new pieces into the loop.
Navy Gunning tends to be simpler because you don't have to clean dirty cannons, and there is no pressure to load cannons before a turn is up, like on a pillage. For an excellent guide on navy gunning, check out Boothook's Navy Gunning Guide.
Don't board shop
Board shopping is repeatedly entering and leaving the puzzle without making any fills, until a good board is found. This is bad! It may not seem like much time, but it still takes almost two seconds to enter and leave the board. Considering the best gunners average about 6 seconds per cannon loaded, that is a lot of time wasted!
Always fill at least 1 cannon on every board
This justifies the wasted time at the start of the puzzle when pieces are still being shot out of the barrel. Also, every puzzle - even the worst ones - will have at least one 2-cannon loop that can be used -- the loop across the middle of the board, shown above in the Cannons with No Loop - Filling the Easy Cannons section.
Filling all 4 cannons can hurt
Because some boards have dead ends and poor loop structure, it may not be worthwhile to fill all four cannons in the Navy. Filling those tough third and fourth cannons may cost too much time, and it would be wiser to just reset the board and start fresh.
