Boothook's Navy Gunning Guide
| The topic of this article is subject to personal opinion, and does not represent any one absolute truth. | |
| If you disagree, discuss your concerns on the the talk page before editing. |
Introduction
The Navy Gunning puzzle can be solved by using the same sequence of arrows on every single board. Strategy is not required, since you can solve every single board using the exact same method. In other words, Navy Gunning can be reduced to a game of pure reflexes, because you can solve every board using the same sequence of arrows.
Here is a video of this method:
http://www.youtube.com/watch?v=0pcZ4Gp8aRw
Here is a link to the other half of the Gunning guide: Boothook's Difficult Cannon Gunning Guide
The Gunning Method
This method involves loading 2 cannons, then dismissing the board. If for some reason your pieces get messed up while you are loading the 1st cannon, then you can easily dismiss the board right after the 1st cannon is fully loaded. Navy Gunning does not have a big penalty for abandoning untouched cannons, so it is perfectly acceptable to dismiss a board even if you've only loaded 1 or 2 cannons.
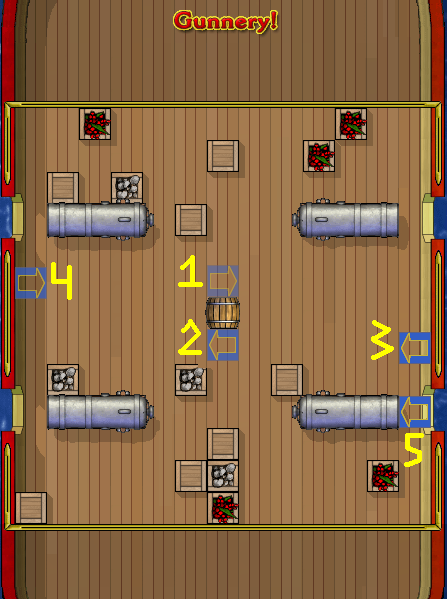
Arrows 1-3: Arrows 1, 2, and 3 are placed as quickly as possible.
Arrow 4: Arrow 4 is placed shortly after the barrel launches its 5th piece (2nd piece launched to the North position). More specifically, arrow 4 is placed right after the 5th piece bounces off of the 1st arrow.
Notice that if you place these 4 arrows correctly, then you are guaranteed that all 8 Gunning pieces will be in the same loop, in the absolute quickest time possible, in every single Gunning board in the game.
Arrow 5: Arrow 5 is placed shortly after the barrel launches its 7th piece (2nd piece launched to the South position). More specifically, arrow 5 is placed right after the 7th piece bounces off of the 2nd arrow.
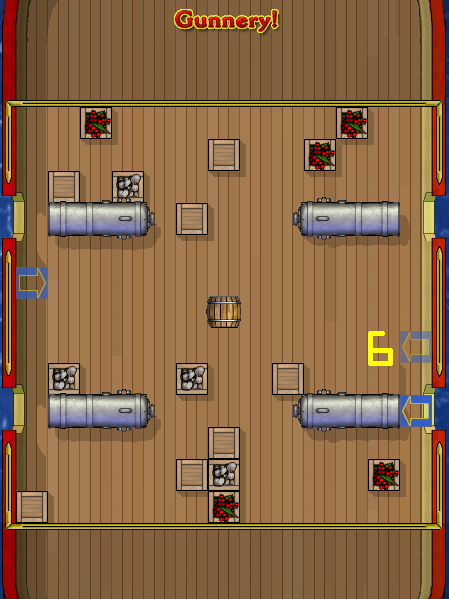
Arrow 6: Arrow 6 is placed multiple times. Arrow 6 alternates between being a left-arrow and a down-arrow, until the bottom-right cannon is filled.
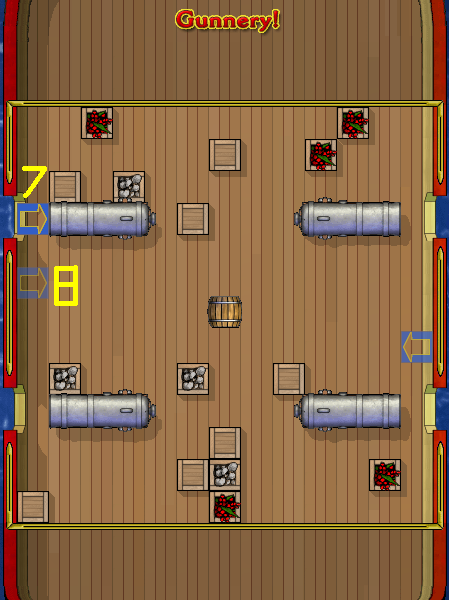
Arrows 7-8: When there aren't any pieces on the 8th arrow tile, then place arrows 7 and 8 as quickly as possible. When you place the 7th arrow, the arrow on the 8th arrow tile will disappear, which is why you need to place the 8th arrow immediately after you place the 7th arrow.
Arrow 8 continued: Arrow 8 is placed multiple times. Arrow 8 alternates between being a right-arrow and an up-arrow, until the top-left cannon is filled.
Now dismiss your board and get a new one.
Tips and Tricks
Placing arrow 1: Ideally you want to place the 1st arrow so quickly that the 1st piece bounces off of the 1st arrow. When my Gunning board is loading, I place my mouse over the 1st arrow tile, and rapidly press both the 'd' key (select right arrow) and the left-mouse-click (place arrow), until the 1st piece bounces off of the 1st arrow. Since you can't see the 1st arrow tile while the board is loading, it might help to put a piece of clear tape on your monitor, over the spot where your mouse cursor should go.
Don't worry if you can't place the 1st arrow quick enough to catch the 1st piece, because in most boards it won't make a difference. The only difference is that you might have to monitor the stray piece to make sure it's not going to cause harm.
Alternate arrow sequence: If you have trouble with placing arrows 7-8 with the above method, there is an alternate method that you can use. Yes, it is a bit slower than the above method, but it still is a good alternative if you need it.
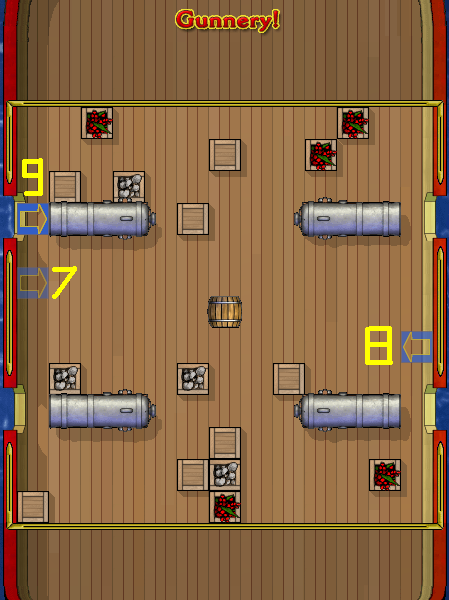
Arrows 7-9: Place arrows 7-9 on the board. You don't need any speed or timing to place these arrows.
Arrow 7 *again*: Arrow 7 is now placed multiple times. Arrow 7 alternates between being a right-arrow and an up-arrow, until the top-left cannon is filled.


