User:Alfwyn/Mix and Match
This tutorial shows a relatively painless way to Mix and Match a complete colorchart from a few obtained screenshots for trinkets or familiars with two colors. The description of the actual commands/menus used is based on GIMP, but the general strategy should apply to other image manipulation programs as well. The Notation "View->Zoom->4:1 (400%)" is used to mean to select the menu labeled "View", from there the submenu "Zoom", and finally there the option "4:1 (400%)". The actual path to a particular option may vary from version to version though, but either experience with GIMP or a bit of searching should find the option. I myself usually work at 400% zoom when working with trinkets, so I can easily distinguish every single pixel, in some cases I even use 800% zoom.
Contents
The Task
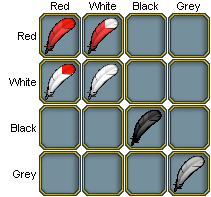
Let's assume we have an existing colorchart and want to add two new colors to it. For this example the existing chart consists of all combinations of red and white images, and we newly obtained a black/black and a grey/grey image. The task is now to create the completed colorchart for all possible combinations of colors from this. In reality there will be more colors to deal with, but this should suffice to demonstrate the principle, even if the overhead of the method may not pay off for such tiny charts.
Step 1
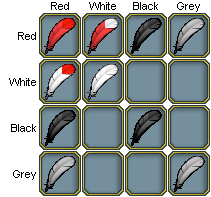
The first step is to create a row containing all the different colors as well as a column containing all the colors, even so the mix of the colors isn't right at the moment. From this we extract a complete row as well as a complete column as separate temporary images. Only creating those temporary images is important in this step, creating them without modifying the base image is fine too.
Here the black/black as well as the grey/grey feather were each selected with "rectangle select", copied with CTRL-C CTRL-V, moved to the desired destination and anchored there. To create the temporary images it is easiest to select the whole region we want to copy over with rectangle select, before creating the temporary images via "File->New". This way the newly created images will automatically have the desired size. Finally we go back to the base image that still has the rectangle selected, use CTRL-C to copy the region, go to the newly created one and paste it there with CTRL-V. There is no real need to save this temporary images.
Below are the two temporary images created so far:
The Mask
The next step will be to separate the pixels of the primary color from the pixels of the secondary color. For this we extract an existing image of a single trinket with a good contrast between the two colors in yet another temporary image. For the next steps to work seamlessly it is important that this image is exactly 43x46 pixles big.
Having done this we now delete all the pixels belonging to one of the two colors. Sometimes this is easiest done by selecting some geometrical region. This was the case in this example were two rectangles (with slightly different height) were deleted (CTRL-X after the region is selected). In other cases this better done with "Select->By color", experimenting with the treshold slider a bit. If doing it this way it is usually best to use a background color that is different from the two colors of the trinket. It is ok to delete a few additional pixels that aren't affected by the color combination of the trinket, like the grey of the background. It is worthwhile to save this temporary image now, since we will need it two times, slightly modified - once to mask out the color for the rows, once to mask out the color for the columns. We may even want to reuse the mask once we encounter new additional colors for the same trinket in the future.
Using the Mask: Columns
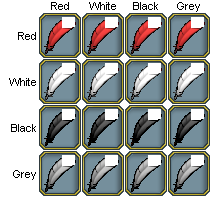
Here transparency (shown as grey) was enabled via "Layer->Transparency->Add Alpha Channel". After this "Select->By color" with a treshhold of 0 was used to select all the white pixels of the mask. Inverting the selection with CTRL-I and deleting the inverted selection with CTRL-X produced the image shown to the left.
Next the mask was multiplied to span a whole column. This can be done via "Filters->Map->Tile". Since we only want to repeat the image columnwise the chain connecting width and height in the dialog this option produces needs to be unlocked. The width is left unchanged, the height multiplied by the number of trinkets in a column - 4 in this example. A calculator comes in handy at this step.
Using "Select->All" on the column spanning mask and copying it over the extracted column from "Step 1" produced the image to the left.
Finally the masked row was copied 4 times over to the base image. If there are many rows to do, it may worthwhile to use the tiling feature again on the masked row first, this time leaving the height unchanged and multiplying the width by the numbers of columns.
Using the Mask: Rows
For the rowmask we go back to the saved mask shown to the right. We enable transparency again and select again all white pixels, deleting them this time. The remaining pixels are colored white with the bucketfill at maximum treshold (255).
Using the tiling feature to mutilply the mask creates the image to the left.
Copying the row spanning mask over the extracted row from "Step 1" creates this image. This can now be directly copied over to the base image, this time only copying all non-white pixels (using "Select->By color" to select all white pixels, CTRL-I to invert the selection, CTRL-C to copy). Again if there are many rows to do one may want to multiply this image first with the tiling feature instead of copying it once for each row.
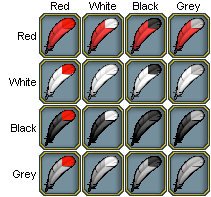
The Result
This is the final result of our working example with all the color combinations showing. While the procedure described here may appear complicated at first, it saves a lot of time compared to copying several dozens (or in some cases even several hundreds) trinket fragments by hand.


