ScenePainter/1.5
This is the archived page for version 1.5 of ScenePainter. Please refer to ScenePainter for the latest version.
Contents
Starting ScenePainter
ScnenePainter (SP) is written in Java and provided as JAR-Archive. No installation is needed, only a working JRE. You can run the JAR directly by double clicking it. SP will ask for the location of Puzzle Pirates or any Nenya game.
Using ScenePainter
SP is mainly controlled with the mouse, though there are also keyboard shortcuts.
Mouse
- Left Button clicking: Drag and Drop models on scene
- Right Button clicking: Drawing a clipping area
- Middle Wheel clicking: Deleting a model from scene
- Middle Wheel scrolling: raising/lowering the active layer
Keyboard shortcuts
- Alt-Q: Quit Application
- Alt-E: Export Model
- Alt-I: Import Model
- Del: Remove Model Component (from Bin)
- Alt-A: Remove entire Model (from Bin)
- Alt-B: Toggle Boxes
- Alt-G: Toggle Grid
- Alt-R: Toggle Rulers
- Alt-T: Import Image
- Alt-S: Export Scene/Clip
- Alt-D: Toggle Layer Dialog
- Alt-M: Toggle Mousemeter
- Alt-C: Toggle Clipper
- Alt-Y: Toggle Chattering
User Interface
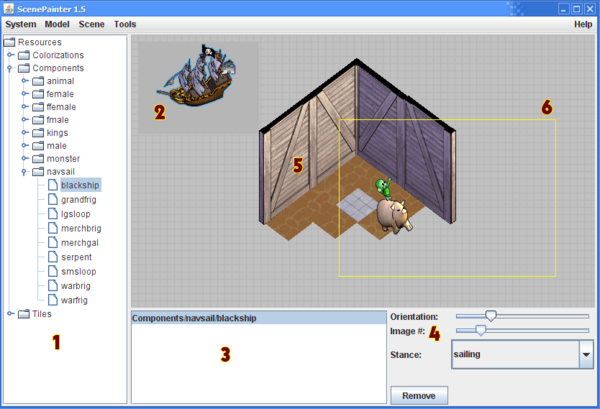
Ressource Tree (1)
This control show all available resources from the selected game. For PP there are 3 categories:
- Colorization: Provides colors for certain components. Generally speaking a base color is replaced by the desired one. Example from the game: There is only one image for Fancy Boots, which is recolored.
- Components: Parts for animated objects (avatars, pets etc.)
- Tiles: static objects, which populates scenes (furniture, walls, floor etc.)
Selecting a resource sends them to the Model List (3) (and Bin (2)).
Bin (2)
The Bin contains a complete model comprised by the components listed in the Model List. From the Bin an arbitrary number of instances of a model can be dragged into the scene. The model in the Bin can still be altered with the Mutators (4), whereas the instances are immutable.
The Bin is always the lowest layer in the scene and will not be exported into images.
Model List (3)
The Model List contains selected components from the Resource Tree (1). From this list the model in the Bin (2) is built and can be used in the scene. The behaviour is context base (i.e. SP tries to guess whether the user is building a model or just trying different colorizations).
With an empty Model List selecting a colorization will display a square. Left half representing the base color and right half showing the replacement color.
Selecting a tile will always clear the list. Same will happen when the first component is chosen. All following components will be put in higher layers, i.e. above the previous components, (but below the first component in the list). Selected components in the list can be removed by clicking on the Remove-Button or hitting Del.
Components are recolored by selecting the desired component and then the appropriate colorization. But only the first color of a certain kind after the component is shown.
Mutators (4)
There are three Mutators:
- Orientation: valid for animated components (avatars, ships etc.). Rotates the model. The orientation is cycled, i.e. moving the slider from one end to the other will result in multiple turns of the model.
- Image #: Index for resources with multiple views. Tiles usually have different views (e.g. leftfacing/rightfacing wall). Animated sprites (e.g. walking avatar) cylcle through the movement.
- Stance: valid for animated components.
Unused Mutators ars ignored.
Scene & Layers (5)
The main window is used for the Scene. A Scene consists of different layers. Each layer containing one model taken from the bin. There are some helpers which can be used with the scene. A grid for alignment (no snapping) and boxes to see the boundaries of models.
The scene in the screen shot uses 18 layers:
- 1 layer for the Bin with The Black Ship (grey area, top left corner)
- 7 layers for the walls (4) including corners (1) and ends (2)
- 9 layers for the floor tiles. 8 Red Stone, 1 Square Tile
- 1 layer for the pig with green monkey (in victory pose)
Layers can be arranged with the Layerdialog. Attention! Layers are currently shown in reverse order. First entry is lowest layer (covered by every other layer), last entry is highest layer (completely visible). The active layer, usually the last model placed, can be arranged with the mouse wheel. The active layer can be selected in the Layerdialog. With a visible Layerdialog the active layer is surrounded by a green box.
Clipping Box (6)
SP offers the possibility to export only a selection of the whole scene. This is done by drawing a box with the right mouse button. The clipping box is represented with a yellow outline. Everything visible within this box will be exported.
Menu Items
System
- Dump Colormaps
This command will dump a file called colordefs.xml in the program folder of SP. This file contains the current mapping of colors and replacement colors. With this definitions the library knows how the replacement color should be altered, to get the desired color. Please refer to the Nanya documentation for further information. After altering the table it can be recompiled into the resources. Use at your own risk! Most likely the game won't work after that!
- Quit (Alt-Q)
Close the SP.
Model
- Export Model (Alt-E)
Will save the current model shown in the Model List (and Bin on stage) to a TXT-file for later use. Filename and location can be chosen.
- Import Model (Alt-I)
Imports a previously saved model into the Model List and Bin. Usually its a simple text file listing all used components and colorizations. This is an easy way to use complex models like Pirates, which consist of at least 6 components and their colors.
- Remove (Del)
Removes the selected item in the Model List or the last one item, if none selected. Same effect as using the Remove button right of the Model List beneath the Mutators.
- Remove All (Alt-A)
Clears the Model List and thus the Bin.
Scene
- Show Boxes (Alt-B)
Toggle the display of gray boxes around a model. Within theses boundaries a drag will move the model. Boxes will not be exported.
- Show Grid (Alt-G)
Toggle the display of a layout grid on the scene. This grid can be used for alignment of models. The grid will not be exported.
- Show Rulers (Alt-R)
Toggle the display of rulers. Doesn't currently work.
- Import Image (Alt-S)
Imports PNG images into the scene. Imported images can be moved and arranged like any other model. This is an easy way to create a scene where all models are completely visible. So you can avoid building a whole beach for two pirates standing there. Just capture the background right out of the game, import it as image and place models on top of that. The same way non standard graphics like posters or paintings can be imported.
- Export scene/clip (Alt-T)
Exports the complete scene or everything inside a cropping box (yellow outline) as PNG image to a destination of the users choice.
- Clear Scene
Clears everything in the scene.
Tools
- Labeltool
This tool will create labels like names of pirates or NPPs. Via a dialog box you can enter:
- Text: No length restrictions. Will be a single line. Control characters (e.g. \n) are useless.
- Font: Default is the font used ingame. Any installed font can be used by typing the name into the box. Default will be used, when the font is unknown.
- Size: The desired font size in pt (Point). Ingame labels have a size of 10 pt.
- Color #1: Color used for the text itself in RGB-Hex notation. E.g. Yellow is #FFFF00.
- Color #2: Color used for outline in RGB-Hex notation.
- Appearance: Style of the label. Outline is used for pirate names.
Pressing Render will create the desired label. A newly rendered label will clear out the Bin, but the Model List will still contain the used parts. An existing label in the Bin will be replaced.
- Layerdialog (Alt-D)
Manages the layers. Layers are listed bottom up, i.e. lowest layer (Bin) first, highest layer last. A selected layer can be moved through the list. Moving a multiselection will only move the first layer of the group. There are also three buttons for deleting, exporting and cloning (duplicating) of layers. The text box contains the current position and allows changing position.
- Mousemeter (Alt-M)
Displays a small box with the current position of the mouse pointer. Distances can be measured by pressing and holding the left mouse button.
- Clipper (Alt-C)
Allows the selection of a clipping box by entering values. Enter x and y coordinates of upper left corner and width and height of the current layer in pixel. There is also a button, which selects everything within a model box (see Show Boxes).
- Sequencer
Provides an easy way to create a series of pictures. From a basename and an index a PNG image is created and the counter is raised by 1 when Save is pressed. A series is needed e.g when animating a walking pirate.
- Chattering (Alt-Y)
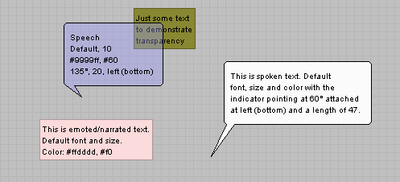
Creates player actions (talking, thinking, emoting etc.) as used ingame. Pressing Render will create the action according to the options. The dialog offers different option:
- Font: like with the Labeltool any font can be assigned. Default results in the font used ingame
- Size: the font size in pt. 10pt is default game size.
- Color: The color of the bubble/box background. First parameter is the color value in RGB-Hex notation, second parameter is the alpha value in a HEX word allowing 256 levels of transparency. #00 means invisible, #ff opaque. Default value is #ffffff, #f0 which is pure whit slightly transparent.
- Type: currently only two styles are available. Speech for speech bubbles and narrator for emoting texts.
- Angle: the angle the indicator pointing to the avatar who is performing certain actions. Angles can be described with positive and negative values: 0 points to the left, 90 points straight down, 180 to the right and 270 (or -90) upward. An adjustment of the docking position may be needed.
- Length: the length of the indicator pointing to the avatar who is performing certain actions.
- Dock: point where the indicator pointing to the avatar who is performing certain actions is attached to the text. There are 8 positions.


