Howto:Alter a screenshot
Altered screenshots are used in many parts of the game community, such as avatars, intent posts, and events. They're often created by simply cutting scenes apart and putting them back together in a different order, like a collage. One thing to keep in mind, though. Faked screenies are fake. No one will believe Cleaver told you that you can have Alpha and a lifetime sub just because you created proper chat bubbles.
Contents
Links for piratey images:
The Y!PPedia itself has been cataloging images for several years. Everything from furniture to ships to trinkets has had its backgrounds removed and uploaded. There are also many ingame pictures on your own hard drive if you downloaded the client. Browse around Three Rings Design\RSRC\bundles\media for screenie resources. Here are some other image resources.
ScenePainter Great for chat bubbles and things that might be hard to screenie in specific poses, like Dragoons.
Yohoho Tools Y!PP's own scene dev tool. Great for backgrounds.
Quid Pro Clothes Especially their Design Studio.

Image Editors:
Layers are highly recommended for screenie editors. As long as the program can paste something as a new layer and you can change the transparency of said layer, it's good enough. I recommend Paint.NET or The Gimp. They're both freeware.
MS Paint Tips
If you can't get anything else, it's likely your computer will have a very basic editor like MS Paint. Altering screenies is harder without layers, but it's still possible. Here are some general tips to get you started.
- Make your work area bigger. Go into Image/Attributes and enter a couple big numbers for the width and height, or click on the little square in the corner of the work area and start dragging. Double the size if your memory can handle it. The extra room on the edges can hold pirates, text, furniture, etc. to be cropped and pieces of large screenies that need to be put together.
- Go Alting. Much like Y!PP, you can have two instances of MS Paint running at once. Just click on the icon again to launch another. Use one for your main screenie and one to crop pictures.
- I recommend some overlap if you have to put two screenies together, but you'll only have one row of pixels to line things up with. Try to make overlapping pieces with straight lined items on their edges. Zoom in while lining them up.
- Remember to select the transparent background when cutting and pasting. It'll be at the bottom of the toolbar after you select a selection tool.
Giant Screenies
Sometimes, a scene is just too big for one screenshot.
- Open your graphics program and visit the scene you want to take a screenshot of.
- Take your first screenshot as per the directions on the screenshot page.
- In your graphics program, open a new file and choose to paste as a new layer.
- Ingame, move to another area of the scene and take a second screenshot.
- Go back to your graphics editor and paste this second screenshot as a new layer right overtop the first one. There should be some overlap between the things in the first and second screenie.
- Change the transparency of the second layer to about 50%.
- Move the top layer around until the two screenies match up. The picture should look sharp and unblurred. This is easiest with things that have straight lines, like posts and masts, and a bit harder with a scene that has a lot of plants, squiggly lines, etc.
- Bring the transparency of the top layer back to 100%
- Merge the two layers. You now have one big screenshot.


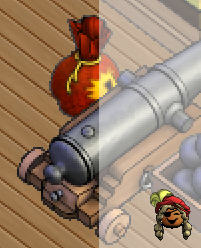
Lining Things Up
To properly align objects and pirates for chat circles and such, I use stand-in alts and a flood-filled grid.
Stand-ins
The best way to line pirates up in screenshots is to have pirates line up ingame, then paste other people right over top. Here's how to do it.
- Take two screenies, one with the chat circle in it and a "blank" where the pirates you want to replace are standing. The blank should be the bottom layer and both layers should be lined up with each other. You can check this by decreasing the transparency of the top layer.
- Paste your replacement pirate as a new layer and line him up overtop your stand-in alt. This works best if the pirate you're replacing has the same outfit, injuries, and hairstyle. Matching colors isn't necessary. If you can find a near-twin, then you can skip the next step.
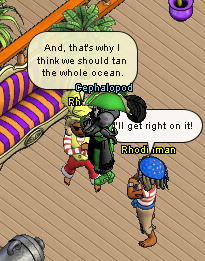
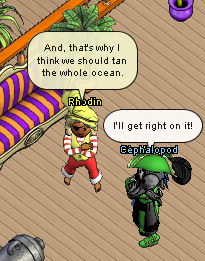
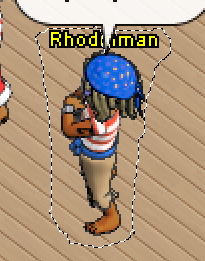
- As you can see, Rhodinman and Cephalopod don't overlap exactly. If your stand-in sticks out a bit, then hide your replacement's layer and go back to the main layer. Use the lasso tool to select around your alt. Be careful to preserve the tail of the chat bubble. Press delete and the blank will show through.
- Select the tail of the chat bubble, then go back to the replacement pirate's layer. Make the layer visible again and press delete so that the tail of the chat bubble appears to be over the name. If you aren't using a layered program, then select the chat bubble tail, copy it, and move it to the side before pasting down your replacement. And there you have it, now Cephalopod can totally brag about meeting Rhodin ingame. >.>


The Grid

Puzzle Pirates scenes are made up of tiles and sprites arranged on an isometric grid. The grid's most easily seen on the marble tiles in palaces. With this grid square, you can more easily align things in scenes, and even line up your own custom furniture.
![]() The square is a tile, all you have to do is flood-fill it onto a new layer and you're ready to go.
The square is a tile, all you have to do is flood-fill it onto a new layer and you're ready to go.
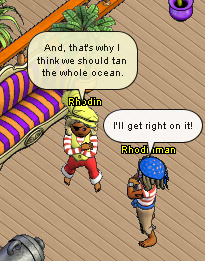
Text

Properly rendered text can really add to the veracity of an altered screenshot. All too often, people will carefully set up fights with alts, make elaborate backgrounds in Scene Editor and carefully select fancy outfits for their QPC models only to use the first thing that comes up when they click the Text button. No one's going to believe that Cleaver really supports your flimsy political position with a hand-drawn chat bubble and the wrong fonts for the bubble and his name.

Now that's more like it. Note the believable rounded rectangle shape of the chat bubble and the proper pirate name in the proper OM/Dev color. The text in this screenie was created in Scene Painter. As you can see, you can make your pirate's name any hex color you want. Cleaver's name ended up being #7FD1F9.

The chat bubble's transparency in the altered screenie is 90% in that screenie since chat bubbles are always semitransparent. When a new chat bubble is made, the older ones turn yellower. If one chat bubble is left to fade out, it'll fade out white. If something else is said, the bubble will fade out in its new yellow color.
You can also use the client to generate chat bubbles. Just stand in a scene that sort of matches the color of the screenie you want to make and take a screenshot of the text you want. I find it easiest to magic wand the chat bubble itself, expand the selection by one, invert, then delete the background.