User:Henryrules10/Distilling tutorial
Page under construction
Ahoy! Nickbush here from the Church of Distilling. Today we will learn how to distill and distill well. Distilling is the fine art of making rum. For most players it can be an annoying puzzle, one which can cause a sane man to kill. This puzzle takes a lot of patience and a TON of practice to get good at.
That's why I made this guide, to help people overcome their fear of distilling.
Introduction
How to play
- For more information, see the Distilling article.
The basic idea of distilling is to construct columns composed purely of white bubbles while sending brown and black bubbles down to the furnace.
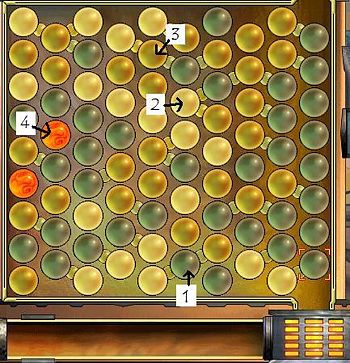
Only pieces that have a link between them can be swapped. The rules for moving pieces are as follows (see Figure 1 for an illustration):
- Blacks move up with brown and down with white
- Whites move up with black and down with brown
- Browns move up with white and down with black
- Spices are immovable
Basic strategy
As the basic idea is to try to send up only columns of white, and because sending up consecutive columns of white give a higher scoring bonus, the typical way to play distilling is to try to get as many whites on the board as you can before sending stuff up. While it may sound easy, it takes a lot of practice to get more and more whites on the board. If you're just starting out, the goals and strategy section of the main article is more well-suited for you. Once you've gotten to the point where you're sending Crystal Clears up in two groups, that's when this guide will start to become more helpful to you.
The true test of distilling skill lies not in how many Crystal Clears you can get in a row, as that can depend wholly on luck. Rather, it lies in how many columns of pure white you can get on the board before you have to start sending columns up. If you're able to get around six columns of white on the board before you start sending columns up you're on the right track. This is about a Master/Renowned range. Around seven columns means that you should be around a Grand-Master level. Seven and a half to eight columns is considered to be around a Legendary distilling level, as you can usually get around a CC10-CC11 with that, with the occasional CC12+. Ultimate-level distilling pretty much requires you to consistently get eight to eight and a half full columns on the board. If you're able to consistently get over eight and a half to nine fully white columns on the board then you have a really good chance to get the #1 spot on your ocean. Please note that these numbers are just from my personal experience.
Moving modes
The first thing to remember when distilling is that there are three different modes of moving pieces:
| Mode | Description |
| Mode I | Moving whites through nonwhites |
| Mode II | Moving nonwhites through whites |
| Mode III | Moving nonwhites through other nonwhites |
Modes I and II directly move whites into favourable board positions, whereas Mode III is used to help facilitate Mode I and Mode II movement, depending on the point in the game. To distill well you must use each mode where appropriate.
Knowing how to use each mode of movement is critical to becoming good at distilling. If you only use one mode of movement, you could at best be wasting time doing stuff you could be using other modes for; at worst, you could make the board unsolvable and really damage your score and ranking.
In this section, Stage I refers to the part of the game where you try to get rid of nonwhites, and Stage II refers to the part of the game where you send up whites. These stages will be covered in more detail in the next part of the guide.
Mode I: Moving whites through nonwhites
Mode I is just moving whites through nonwhites. Remember that whites go up through black and down through brown. Using Mode III movement (i.e. nonwhites through other nonwhites) and the occasional Mode II movement will help you achieve your objective. Mode I movement is used mostly in Stage II, but it can also be used in the early part of Stage I when whites are sparse and moving nonwhites is too inefficient.
Mode I in Stage I
As stated before, Mode I movement is usually only used in the early parts if it is at all used in Stage I. This is for moving whites to the left more quickly if there is a shortage of whites.
Mode I in Stage II
As should be obvious, Mode I movement in Stage II is simply to get the whites to the right so you can send them up. Mode III movement helps with this a lot, as it creates paths for the whites to move through.
Mode II: Moving nonwhites through whites
Mode II movement moves nonwhites through whites. This is almost always used in Stage I when you shift whites to the left and try to collect them, although it is occasionally used in Stage II.
Mode II in Stage I
In Stage I, the use of this movement is obviously for moving nonwhites to the right so you can burn them. There are many, many ways you can use Mode II movement to get nonwhites to the right. Those will be covered in more detail in the Stage I section.
Mode II in Stage II
Mode II movement won't be used that much in Stage II. The only situations in which you'd need to use it is when you have to smoothen out the sea of whites or dig out nonwhites from behind spices.
Mode III: Moving nonwhites through other nonwhites
Mode III is probably the simplest movement, as it only involves browns and blacks. There's only one rule for this kind of movement, and that is that browns go down and blacks go up. Mode III movement doesn't seem to do much, but it is as important as the other two modes of movement in that it helps the other two do their job.
Mode III in Stage I
In Stage I, Mode III movement helps to make replacement (a technique we will learn about later on) much, much easier. It also helps to keep blacks high and browns low so that in case of emergency, you have a supply of whatever you need to fix it.
Mode III in Stage II
In Stage II, this kind of movement is used to create the paths that the whites can go through. You can also use them to dig out problem pieces from behind spices in conjunction with Mode II movement.
Stages of the game
As stated before, there are two major stages of the distilling game. Stage I is where you try to move all the whites to the left and the nonwhites to the right. Stage II is where you try to shift all the whites that come in into the columns that are being sent up.
Stage I: Burn, baby, burn
There are three main parts to the first stage of the game - cleaning up the starting board, shifting nonwhites to the right, and deciding when to start sending up whites. Each part will be discussed in its own section, as follows.
Part 1: Cleaning everything up
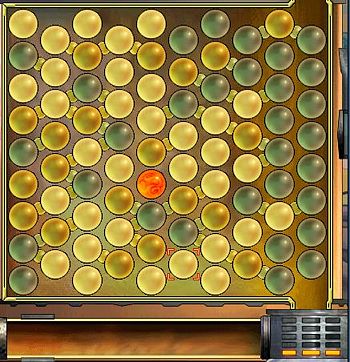
When you start the game (note: the rightmost row always starts out as all black), the pieces are jumbled about, as seen in Figure 2.
The key here is to organise the pieces and smoothen the board out so that you can move on to Part 2. There are a few things you can do in this part.
Part 2: Moving the waste
This is the part you'll spend most of your energy on.
Part 3: Decision time
Now comes the hard part - the part where you decide whether to burn another row or start sending up columns of white. The same tactics you used in Part 2 come in handy here, although you may not be able to use some due to the lack of space on the right to manipulate blacks and browns.
Stage II: All good rum goes to heaven
(under construction)
Spices
(under construction)

