Rumblevideos explained
Rumble Videos
There is a fair number of videos publicly accesible that show how the rumble puzzle can be played. A few of them are referenced on the main yppedia Rumble page. There are also some articles explaining the strategies in this puzzle and some of the underlying game mechanics. Most notable are Boothook's Rumbling Guide and Rumble strike calculations.
On the other hand few players know how to use the available information in actual game. By watching the videos of the masters the applied strategies and underlying game mechanics are often not recognized.
This article analyzes some of the videos and points out some noteworthy aspect.
Boothook vs Gogu 1 (side by side)
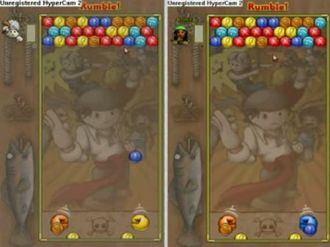
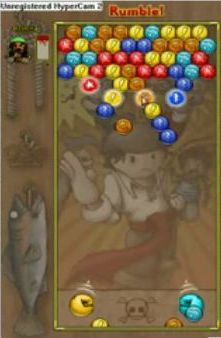
The video of Boothook vs Gogu 1 shows the puzzle of both players side by side. We therefore use it to show some of the basic game mechanics and how they affect the opponent. You should now watch it once in full length to get an impression of how this particular game flows. Bear in mind that this is the game of two high ultimate ranked players. As a beginner or even intermediate player you can not expect to match their speed of decision-making and precision of playing, so don't despair.
The start
The start of the rumblepuzzle is always similar. Some things you should pay attention to:
- Note which bludgeon the players use. While someone should know which bludgeon oneself uses the bludgeon of the opponent is often unknown till the game starts. In this video the person shown on the left uses a tan/brown blackjack while the right hand player uses tan/grey rope coils.
The blackjack is considered a rather powerful bludgeon. It favors the use of small strikes which we will see put to use later in the video.
The rope coils on the other hand are considered weaker overall but are very versatile in the strategies that can be used. Furthermore they are rather cheap and can be used by non-subscibers. The master in this video uses an approach of wide strikes combined with sprinkles to overpower his opponent with this apparently weaker weapon.
- Also a little known fact is that, similar to swordfight, the actual starting board as well as the color sequence of the balls is the same for all players.
Strikes
When you watch the first few seconds of the video you can see that both players start the game with building strikes. Strikes are build by charging balls. A charged ball will attach itself to 2 or more same colored balls on the playing field, thus generating or expanding a so call charge group. In this particular instance no group of 2 or more of the colors present in the launchers (orange and blue) were present on the field. So both players get rid of the blue ball on the right launcher by attaching it to the right blue ball in the bottom row. This creates a 2-ball group that can be charged later with another blue ball.
To generate a charged ball the fire button is held down instead of immediately releasing it. The ball on the launcher will start to flash, this is accompanied with a sound. The ball is fully charged at the moment the sound changes. This is the moment the ball in the launcher starts it flash. To gain optimal speed a charged ball should be released at the earliest moment, but be careful: If it is not fully charged it remains just a normal ball popping the group you wanted to charge. And thus the precious seconds mischarging are wasted.
A charge group will be popped just like a normal group of same colored balls. But all charge groups created with charged balls after the one creating the charge group will be popped simultaneously. This will then generate a strike coming in from the upper right or left corner of the opponents screen. Strikes are generally much more efficient in filling he opponents screen with balls, which is the ultimate way to win in this puzzle.
The first strike
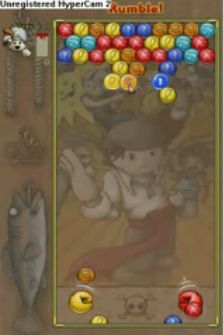
About 8 seconds into the game the player on the left is ready to release his first strike. As you can see he charged a orange group, then a yellow and after that he used another blue ball to make a charge group including the initial blue ball. Now he is ready to fire another orange, uncharged ball from his left launcher at the charged group. As we have 3 charged groups, the one popped and 2 more, this creates Bim! on the puzzle. The charged groups just vanish with that. Also there is a lone yellow ball attached to the blue group. This ball falls also down.
We can use the tables in the Rumble strike calculations to determine what will appear at the opponents screen. We have 3 groups, one drop-off (the yellow ball) and the trigger as one extra ball, meaning all 3 groups consist of 3 balls only. According to the tables we can expect a strike coming in with the height of 2 row and a width of 5 balls. The yellow extra ball will generate a bruise. As the releasing orange ball was fired from the left launcher, the strike will come in from the top right corner at the opponent.
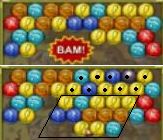
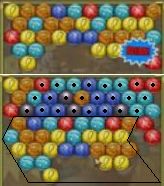
To the right we show you the board immediately before and after receiving this strike. There were indeed 10 new balls introduced into the playing field, they are marked with dots in the picture. The pieces that previously were in their place were shoved to the lower left accordingly, that area is marked.
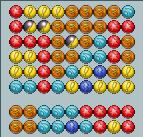
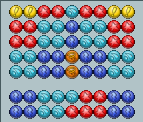
If you look at the picture above or the blackjack wiki-page you will find the drop pattern there. The pattern of the new balls corresponds to the strike pattern. That is the 5 right balls of the lowest 2 rows of the upper sections of the pattern. Also be aware of the one bruised ball in the upper row that we expected.
Note that in this case a few yellow groups were created. This is not always the case. In fact especially with the blackjack small strikes like this tend to create many separate ball, which makes it difficult to clear blackjack small-strikes.
The second strike
Just before our right hand player receives the first strike 14 seconds in the game he releases his own strike. How did he time this is so exactly? Well he received a warning. Just before there was a flashing in the top right corner together with some sound notice. As he was not charging a ball and held the trigger in his left launcher he could immediately release his combo before the strike came in and could it all mess up.
Tip: If you have a combo ready but don't want to release it immediately. Have a trigger ball ready in one of your launchers. You can build with the other hand.
Here we have a 4 group strike with 4 drop-off balls and a larger red group, 4 reds + the trigger = 5 extra balls. According to the table that is a 3 high and 8 wide strike to expect. And indeed 24 new balls are injected. Again compare that to the drop pattern.
Notice how a large area of the puzzle is moved around. As the moved area hits the left border it is bounced off, thus moving the lower rows one to the right. Also note that for example the large orange group in the top left, that could be easily accessed prior to the strike and would create some nice dropoff is no longer a single group nor is it accessible anymore.
![]() Arr! This article be a stub. Ye can help YPPedia by expanding it.
Arr! This article be a stub. Ye can help YPPedia by expanding it.
