GCPP:Proposal-Mako
Puzzle Codename: Mako
| Contact | |
| Username: | PogoBeta |
| Additional contact info: | On Midnight as Pogo, AIM as PogoLikeAMofo |
| Project forum thread: | Forum thread |
Game concept
A "Lights-Out" inspired puzzle with a triangular grid and 3 stages that the "light" cycles through. Various irregular shaped pieces are chosen and placed in order to trigger the "light".
QUICK START (How to play)
(Game is playable at http://www.gamegardens.com/gardens/view_game.wm?gameid=64)
(Unofficial (but more complete) version is playable at http://www.gamegardens.com/gardens/view_game.wm?gameid=81)
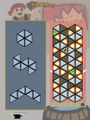
Click on one of the geometric hammers on the left side of the screen, and place it on the grid to change the color of the affected cells. Try to make all the cells light gray, except for the green "enamel" pieces. Surround a cracked cell with orange to remove it. The grid shifts down on a timed basis, so try to make the cells below the white line into light gray cells before they move.
Controls: Select a hammer by left clicking it. Rotate it with the arrow keys or the scroll wheel (or Z key). Flip with right click (or X key). Force the grid to shift early by clicking the scroll wheel down (or spacebar).
Objective
Repeatedly change the lowest 6 rows of triangular cells to the correct state before the timer runs out. Ideally, all cells should be changed to the "cool" state.


Gameplay
The grid is filled with triangular cells, which each exist in one of seven states (including an obstacle piece and two bonus pieces) Normal cells, when activated by the player, change one step in a cycle: Cool(silver) changes to Hot (Orange); Hot changes to Scaled (Brown); Scaled changes to Cool. "Junk" (cracked) cells act as obstacles, limiting the player's movement. Enamel will provide the player with a bonus if it crosses the board without being destroyed.
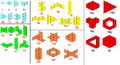
The player is provided with three triangle-based pieces ("Hammers"), which can be picked up and placed on the grid. Cells that are affected by this placement each change state, one step in the cycle. When used, hammers are replaced by means of random generation. There are (currently) 34 possible hammers, ranging from a single cell to an 24-cell hexagon. These hammers can be rotated in increments of 60 degrees or flipped horizontally before placing them on the grid.
A marking on the grid divides (visually) the lowest six rows from the rest of the grid. Once the timer runs out, the cells on the grid shift down six rows. Cells pushed down off the board are scored, and 24 new cells appear at the top. Ideally, the player will change each cell to the "Cool" state before it is pushed down for scoring. Enamel will provide a bonus if it is pushed off the grid. Placing a hammer down on an Enamel cell will ruin the enamel and change it to a cracked "Junk" cell.
If a Junk cell shifts off the board and is scored, the player suffers a score penalty. Junk cells should be eliminated before they can be pushed off the grid. This can be done by surrounding the Junk cell with Hot cells. A Junk cell, when its three adjacent cells are Hot, will change the Junk into a Hot cell. (Exceptions are made for Junk that is adjacent to the left, right, or bottom boundaries, as well as Junk that is adjacent to Enamel or other Junk). A hammer cannot be placed down on top of a Junk cell. If a Junk cell is processed through the bottom of the grid, it will disable the selection of one of the three hammers until the timer has run out once again.
Storyboard
Note: The grid shown in storyboards has a large number of Cool cells already. This is to keep the board fairly uncluttered for explanation purposes. It is assumed, therefore, that the player has already worked on the lower portion of the grid to get it to its current state.


The player has several concerns at this point: There is a junk piece that needs to be cleared, there are some nearby hot and scaled cells that need to be cooled, and there are some isolated hot and scaled cells. If the player doesn't get a few single-cell hammers, he will probably have to sacrifice some already-cooled cells to make progress. He chooses the top hammer (3-cells).


Clicking on the desired hammer causes the arrow cursor to be replaced with the outline of the chosen hammer. The player can then move this outline to the desired location on the grid. The player needs this piece oriented vertically, so he rotates it.


The player moves the rotated hammer into the space he has chosen, and clicks to pound the hammer. The cells that the hammer overlaps are each changed one step. This particular example shows one each of Cool, Hot, and Scaled, and the altered cells have been marked for easy identification.


A new hammer spawns in the empty space left by the previous one. It is a four-long straight hammer. The player knows that surrounding a junk cell with hot cells will clear it, so he selects the bottom hammer this time. He then rotates the hammer and moves it into position.


The player makes the change (marked). Luckily, a single-cell hammer spawns. The player could use this to change the isolated Hot cell on the left side of the grid, but that would only be worth it if another single-cell hammer spawned and enabled him to change the resulting Scaled cell. The player is concerned about the Junk cell, and knows that Heating the cell to the immediate upper left of the Junk will complete the removal. He compares the existing hammers: The top hammer (4-long straight) could be placed in such a way to Heat the necessary cell without ruining the enamel, but only in a way that would also Heat unnecessary Cool cells. The middle hammer (6-cell Hex) cannot Heat the necessary cell without ruining the enamel. The player decides to use the single-cell hammer to heat this cell.


The Junk cell is surrounded on all three sides with Hot cells. The Junk is purged from the grid and Heat is left in its place.
Scoring
Each hammer placement has a small negative effect on the player's score. Each Cool cell that is processed has a positive effect on the player's score. Each Scaled cell that is processed has a small negative effect on the player's score. Each Hot or Red Hot cell that is processed has a moderate negative effect on the player's score. Each Junk cell processed has a strong negative effect on the player's score. Each Enamel cell processed has a strong positive effect on the player's score. Each six-row process with no Hot, Scaled, or Junk pieces is considered a "perfect" process and has a strong positive effect on the player's score (with potential for chaining "perfects").
  From the Proposal Thread, with modifications:
  "Suppose you start with a score of zero.
  Each hammer/piece placed: -1 point
  Each Enamel broken (become Junk): -10 points
  Each Junk purged (become Hot): +5 points
  [when grid shifts downward, 24 cells are processed and scored]
  Each Cool cell processed: +1 point
  Each Scaled cell processed: -2 points
  Each Hot cell processed: -3 points
  Each Red Hot cell processed: -5 points
  Each Junk cell processed: -10 points
  Each Enamel processed: +15 points
  Each Jewelled Enamel processed: +30 points
  Bonus for a "perfect" 24 cells (contains no Junk, Scale, or Hot): +20 extra points
  Stacking bonus for subsequent "perfect" (Cold Steel^n, or something to that effect): +[5x(n)]"
Scoring numbers will be adjusted if/when some testing takes place.

Variability
Junk obstacles and two types of Enamel cells will affect the score if they are shifted off-screen. Junk prevents the placement of hammers on certain parts of the grid. Enamel exists in two forms: regular, and Jewelled. Regular enamel will become Junk if struck. Jewelled enamel will become regular enamel if struck.
There are three "Specialty" hammers. The first is the Quench Bucket. It creates a six-cell hexagon of cool cells wherever it is placed. Quench can be placed on a Junk cell, but it will not clear the Junk. Quench can be placed on regular enamel without consequence, but if it is placed on Jewelled Enamel, it will degrade the cell into regular Enamel.
The second Specialty hammer is the Bellows. It creates a 16-cell block of Hot cells. The affected range can be flipped vertically. The bellows can be placed on regular enamel without consequence, but if it is placed on Jewelled Enamel, it will degrade the cell into regular Enamel. It can also be placed on Junk.
The third Specialty hammer is the Tongs. The tongs, when placed down anywhere on the board, will case the shift timer to pause for a few seconds. Its placement on the board makes no change to any cells, and it is not limited by Enamel or Junk. The reason it must be placed on the grid (as opposed to working immediately when selected) is so the the player has a chance to put it back in the hammer box if he/she so chooses.
End criteria
When the grid has shifted down twelve times, the session is over.
Difficulty scaling
At an easy difficulty, the player will more frequently receive hammers that affect a smaller number of cells. As difficulty increases, larger and more awkward hammers are more frequently generated. Junk and Enamel can also appear more frequently at a higher difficulty.
From the Proposal Thread:
  Note: Groups are labelled with colors for purposes of classification, not in-game graphics.
  Hammers with 5 cells or fewer (Blue) are group A
  Hammers with 6-7 cells (green) are group B
  Hammers with 8-10 cells (Yellow) are group C
  Hammers with 12-14 cells (Orange) are group D
  Hammers with 16 cells or more (Red) are group E.
Original Proposed percentage chance a given group will generate a hammer in the box:
  .   Easy   Med   Hard   Ace   Mad
  A   60     40    30     25    20
  B   35     30    30     25    20
  C   5      20    20     25    20
  D   -      10    15     15    20
  E   -      -     5      10    20
Revised proposal, accounting for Greenie Difficulty and specialty hammers
  .      Grn   Easy   Med   Hard   Ace   Mad
  A      90    60     39    29     24    19
  B      10    35     29    28     23    18
  C      -     5      19    19     23    18
  D      -     -      9     14     13    18
  E      -     -      -     4      8     18
  Buck*  -     -      2     2      3     3
  Bell*  -     -      2     2      3     3
  Tong*  -     -      -     2      3     3
- If a Specialty Hammer already exists in the hammer box, a new one cannot spawn until the current one is used.
Proposal for spawn percentages of cell types by difficulty.
  .      Grn   Easy   Med   Hard   Ace   Mad
  Cool   33    33     33    33     32    32
  Hot    33    33     32    33     33    33
  Scal   33    33     33    32     33    32
  Other  1     1      2     2      2     3
Spawn percentage of "Other" cell types, should they occur:
  .      Grn   Easy   Med   Hard   Ace   Mad
  -RHot  -     -      20    30     30    25
  -Enam  -     50     40    30     30    25
  -J-En  -     -      -     10     10    25
  -Junk  100   50     40    30     30    25
Crafting type
Smithing
Known problems
- 6 of the hammers have rotation problems (which affect gameplay). Some of the hammers may be removed, but the majority of the problem hammers will be fixed.
- Tongs and Bellows have not been added yet.
- Jewelled Enamel and Red Hot cells have not been added yet.
- Some players claim that the game needs to include more shifts (extending the session).
- Junk cells do not currently spawn.
- Enamel cells spawn too frequently (will be adjusted when other cell types become spawnable).
- Spawn percentages must be changed once the remaining Specialty Hammers and cell states are added.
- It is possible for the board to be "junk-locked". That is to say, the player may have only large hammers to choose from, and the existence of Junk in certain locations on the board may prevent the player from placing any hammers.
Notes
There is a second version of the game available on gamegardens, in order to allow further development without defying the Code Freeze. The "Unstable" version (as it is known), contains updates to graphics and a greater library of hammers, as well as fixes to the scoring and timing elements.
Mako Team
PogoBeta (Pogo on Midnight) - Design, Art.
Sigaligasig (Sigismundo on Midnight) - All the programming and GameGardens upkeep.
Original suggestion of the idea, with more illustrations
Larger Animated Version of Hammer placement and grid shift This one's well over a meg, so slow connections beware! (Note: This animation doesn't account for the puzzle timer, the grid shift is shown randomly as an example)
Images

Tiles
A typical session
All possible hammers

